

One of our activites is a monthly (almost) sew-in in Anacortes, WA - at a darling little cottage that has been remodeled and rented out for activities - sewing, yoga, quilting, scrapbooking, knitting or anything you can think of where you need a meeting place. There are tables, nice rolling chairs, waste baskets, a design wall and ironing and cutting stations - just the thing for a quilters' get together. And lots of room for food too - as we have a potluck each month.

For our December meeting we decided to have a "make 'n take" project as one of the activities. It was a secret - just the organizer (Daisy) and I knew about it. We gave instructions for the ladies to bring three fabrics - light, medium and dark - with lots of contrast - in their favorite holiday decorating colors.

We had a grand time making these ornaments - and I did not take one picture of the lovely items that they made - drat!! I only have photos of the ones I made as samples.
You can make them in any color - they could even be used for other holidays if you wanted to fill a bowl with them for Easter - or add some orange ones to your Halloween decorations - maybe leave the ribbons off the top.

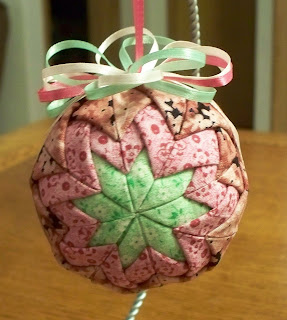
I did take a picture of this one that I made during the class - but I took that after I got home from Anacortes.
I bet some of you remember making things with these folded stars in the early 70s. I had potholders, hot mats coasters and even a toilet seat cover - it didn't seem to bother me one bit that my kitchen and my bathroom matched. Here is a tutorial - step by step - for making the sewn version of the folded stars.

Isn't this one pretty? Oh the fun of making these. If you would like to make some of these for your own christmas - you need a 3" styrofoam ball, three colors of fabric (not very large pieces - you only have to cut out sixteen 2" squares from each color, some pretty ribbon, glue and 186 pins with small heads. That's right - 186 pins - or even a few more if you feel like it. Prepare to have a lot of fun.
And if you don't want to make some - there are some of them for sale over on my Etsy site. And if you order quick enough we can get them to you for the holidays - they are wonderful to look at - a very good conversation piece (how ever did you make that?) and lovely gifts.
Merry christmas ornaments !
2 comments:
Oh, what a kick! I have one of those on my tree. It was a gift from a neighbor back in the 70's. I never made one. I was more into macrame and tole painting! I may give it a try now that you have graciously provided the instructions.
I have one of these folded star ornaments on my tree that was a gift many years ago, and it is one of my favorite!
Post a Comment